Creating a Simple NFT Smart Contract with Solidity and Hardhat
Before we create NFT Tokens with Solidity and Hardhat, let's talk about Solidity. What is Solidity? What is the Hardhat Framework?
Solidity is a statically-typed programming language designed for developing smart contracts that run on the Ethereum blockchain. It is one of the most widely used languages for creating decentralized applications (dApps) due to its compatibility with the Ethereum Virtual Machine (EVM). Here are some key aspects of Solidity:
-
Syntax and Structure: Solidity's syntax is similar to that of JavaScript, C++, and Python, making it relatively accessible for developers familiar with these languages.
-
Smart Contracts: These are self-executing contracts with the terms of the agreement directly written into code. They automatically enforce and execute the terms of a contract when certain conditions are met.
-
Blockchain Integration: Solidity is specifically designed to work on the Ethereum blockchain, allowing developers to create applications that can interact with the blockchain and leverage its decentralized nature.
-
Features:
Data Types: Solidity supports various data types, including booleans, integers, addresses, arrays, and more. Modifiers: Functions can be modified to add additional functionality, such as access control.Events: Solidity allows logging events, which can be used to facilitate communication between smart contracts and front-end applications.Libraries: Libraries in Solidity provide reusable code that can be shared across multiple contracts.Development Tools: There are several tools available for Solidity development, such as Remix (an online IDE), Truffle/Hardhat (a development framework), and Ganache (a personal blockchain for Ethereum development).
Overall, Solidity is an essential language for anyone interested in developing blockchain-based applications on the Ethereum platform.
Hardhat is a development environment for Ethereum software. It consists of different components for editing, compiling, debugging and deploying your smart contracts and dApps, all of which work together to create a complete development environment.
Prerequisites
-
Node v18+
-
Wallet Funds
You need to have
0.001 ETHon Ethereum Mainnet to collect it, you can collect testnet wallet funds from this:
Creating a project
Before you can begin deploying smart contracts, you need to set up your development environment by creating a Node.js project. To create a new Node.js project, run:
npm init
Next, you will need to install Hardhat and create a new Hardhat project. To install Hardhat, run:
npm install --save-dev hardhat
To create a new Hardhat project, run:
npx hardhat init
888 888 888 888 888
888 888 888 888 888
888 888 888 888 888
8888888888 8888b. 888d888 .d88888 88888b. 8888b. 888888
888 888 "88b 888P" d88" 888 888 "88b "88b 888
888 888 .d888888 888 888 888 888 888 .d888888 888
888 888 888 888 888 Y88b 888 888 888 888 888 Y88b.
888 888 "Y888888 888 "Y88888 888 888 "Y888888 "Y888
👷 Welcome to Hardhat v2.22.7 👷
? What do you want to do? …
Create a JavaScript project
❯ Create a TypeScript project
Create a TypeScript project (with Viem)
Create an empty hardhat.config.js
Quit
Select Create a TypeScript project then press enter to confirm the project root.
Select y for both adding a .gitignore and loading the sample project. It will take a moment for the project setup process to complete.
Configuration Hardhat
Configuration Variables
A Hardhat project can use configuration variables for user-specific values or for data that shouldn't be included in the code repository.
These variables are set via tasks in the vars scope and can be retrieved in the config using the vars object. For example, if you do this in your config:
const INFURA_API_KEY = vars.get("INFURA_API_KEY");

module.exports = {
  networks: {
    sepolia: {
      url: `https://sepolia.infura.io/v3/${INFURA_API_KEY}`,
    },
  },
};
And then you set the INFURA_API_KEY with:
npx hardhat vars set INFURA_API_KEY
✔ Enter value: ********************************
In order to deploy smart contracts to the Sepolia network, you will need to configure your Hardhat project and add the Sepolia network.
To configure Hardhat to use Sepolia, add Sepolia as a network to your project's hardhat.config.ts file:
import "@nomicfoundation/hardhat-toolbox";
import { HardhatUserConfig, vars } from "hardhat/config";

// infura api key
const INFURA_API_KEY = vars.get("INFURA_API_KEY");

// sepolia private key for deploy smart contract
const SEPOLIA_PRIVATE_KEY = vars.get("SEPOLIA_PRIVATE_KEY");

// etherscan api key
const ETHERSCAN_API_KEY = vars.get("ETHERSCAN_API_KEY");

const config: HardhatUserConfig = {
  solidity: {
    version: "0.8.24",
    settings: {
      optimizer: {
        enabled: true,
        runs: 200,
      },
    },
  },
  networks: {
    sepolia: {
      url: `https://sepolia.infura.io/v3/${INFURA_API_KEY}`,
      accounts: [SEPOLIA_PRIVATE_KEY],
    },
  },
  etherscan: {
    apiKey: {
      sepolia: ETHERSCAN_API_KEY,
    },
  },
};

export default config;
Compiling the smart contract
Below is a simple NFT smart contract ERC-721 written in the Solidity programming language:
// SPDX-License-Identifier: MIT
pragma solidity ^0.8.24;

import "@openzeppelin/contracts/token/ERC721/ERC721.sol";

contract NFT is ERC721 {
    uint256 public currentTokenId;

    constructor() ERC721("Your_NFT_name", "Your_NFT_symbol") {}

    function mint(address recipient) public payable returns (uint256) {
        uint256 newItemId = ++currentTokenId;
        _safeMint(recipient, newItemId);
        return newItemId;
    }
}
Please change Your_NFT_name with the name of the NFT you will use, for example Dragon NFT and change Your_NFT_symbol with your unique NFT symbol, like this: DNFT
The Solidity code above defines a smart contract named NFT. The code uses the ERC721 interface provided by the OpenZeppelin Contracts library to create an NFT smart contract. OpenZeppelin allows developers to leverage battle-tested smart contract implementations that adhere to official ERC standards.
To add the OpenZeppelin Contracts library to your project, run:
npm install --save @openzeppelin/contracts
In your project, delete the contracts/Lock.sol contract that was generated with the project and add the above code in a new file called contracts/NFT.sol. (You can also delete the test/Lock.ts test file, but you should add your own tests ASAP!).
To compile the contract using Hardhat, run:
npx hardhat compile
Deploying the smart contract
Once your contract has been successfully compiled, you can deploy the contract to the Sepolia test network.
To deploy the contract to the Sepolia test network, you'll need to modify the scripts/deploy.ts in your project:
import { ethers } from 'hardhat';

async function main() {
  const nft = await ethers.deployContract('NFT');

  await nft.waitForDeployment();

  console.log('NFT Contract Deployed at ' + nft.target);
}

// We recommend this pattern to be able to use async/await everywhere
// and properly handle errors.
main().catch((error) => {
  console.error(error);
  process.exitCode = 1;
});
Finally, run:
npx hardhat run scripts/deploy.ts --network sepolia
The contract will be deployed on the Sepolia test network. You can view the deployment status and contract by using a block explorer and searching for the address returned by your deploy script. If you've deployed an exact copy of the NFT contract above, it will already be verified and you'll be able to read and write to the contract using the web interface.
Verifying the smart contract
If you want to interact with your contract on the block explorer, you, or someone, needs to verify it first. The above contract has already been verified, so you should be able to view your version on a block explorer already. For the remainder of this tutorial, we'll walk through how to verify your contract on Sepolia testnet.
Now, you can verify your contract. Grab the deployed address and run:
npx hardhat verify --network sepolia <deployed address>
You should see an output similar to:
Nothing to compile
No need to generate any newer typings.
Successfully submitted source code for contract
contracts/NFT.sol:NFT at 0x5c115157ff01ea06daf334659a90a0f6a6706faa
for verification on the block explorer. Waiting for verification result...

Successfully verified contract NFT on Etherscan.
Interacting with the smart contract
If you verified on Sepolia Etherscan, you can use the Read Contract and Write Contract tabs to interact with the deployed contract. You'll need to connect your wallet first, by clicking the Connect button.
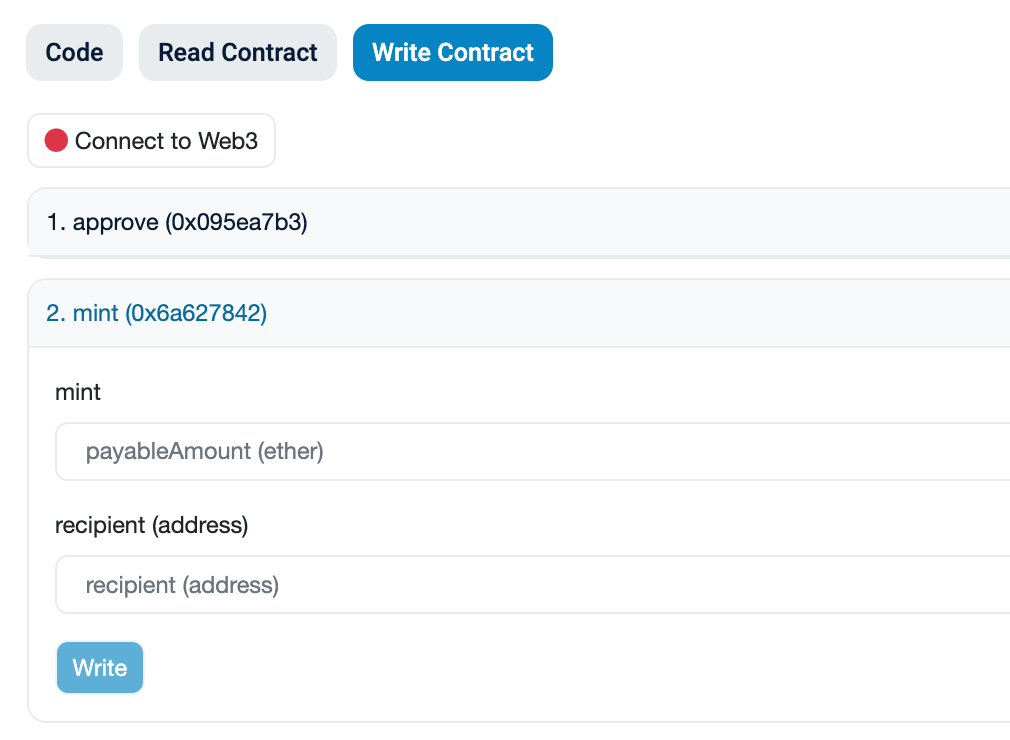
Finally, you can minting NFT with smart contract.
You can check the repository about this blog. https://github.com/masb0ymas/learn-hardhat
Conclusion
With the OpenZeppelin Contracts library, we can create ERC-721 standard smart contracts, create and deploy smart contracts easily using Hardhat. You can customize the network to deploy smart contracts with other blockchain networks in the Ethereum Ecosystem.
Source
https://hardhat.org/hardhat-runner/docs/getting-started#overview https://docs.base.org/tutorials/deploy-with-hardhat/ https://docs.openzeppelin.com/contracts/5.x/